Adding a resume (or CV)
In the previous chapters, we’ve learned how to add all sorts of content to our HTML pages. Now, we’ll look at how to add structure to a large page of content. We’ll add a resume page.
Now, a resume is going to look different for different people. If you’re in academia (or not in the US), you might create a curriculum vitae. People who have worked for many years may have an extensive resume, while students in school may not have much of a work history.
Don’t worry if you don’t have a lot of experience. You can add sections highlighting your education, particularly degrees, coursework, and school activities. Or you can focus on part-time or volunteer work you’ve done.
Another option is to make it less like a resume and more like a portfolio of projects if that’s more applicable to you. You can include any relevant skills you have (like HTML!). Try a web search for resume tips. The web is full of resume advice for people at different points in their careers.
But if you’re not feeling the whole resume thing, that’s okay, too. Feel free to take the markup ideas we explore here and use them however you want. It’s your website, and it’s important that you enjoy making it.
Create the resume file
Create a top-level file, resume.html, and copy the contents of one of the other top-level pages into it.
However you go about creating the file, be sure to update the <title>, <h1>, and <nav>. I will put my name as the <h1> and my profession/summary below it in a <p> tag.
<header>
  <nav>
    <a href="index.html">Home</a>
    <a href="blog/index.html">Blog</a>
    <a href="about.html">About</a>
    <a href="resume.html" aria-current="page">Resume</a>
  </nav>

  <h1>Blake Watson</h1>
  <p><em>Experienced Frontend Engineer</em></p>
</header>
A document with sections
A resume is often divided into sections, the common ones being experience, education, and skills. HTML gives us a tool for creating a generic section of a document—the <section> tag. Each section should have a heading per the docs.
It’s worth noting that it’s okay to use only headings here, too, if you want. I’m opting for the <section> tag to give you an example of how to use it and because Simple.css styles them with nice spacing and dividers between them.
I’ll be creating the following sections. But remember, you can have more or less as needed, and they don’t need to be the same as mine or in the same order.
- Skills
- Experience
- Selected projects
- Education
Skills
For this, I will list my relevant skills in short bullet points. I’ll use a level 2 heading, and I’ll wrap the entire thing in a <section>.
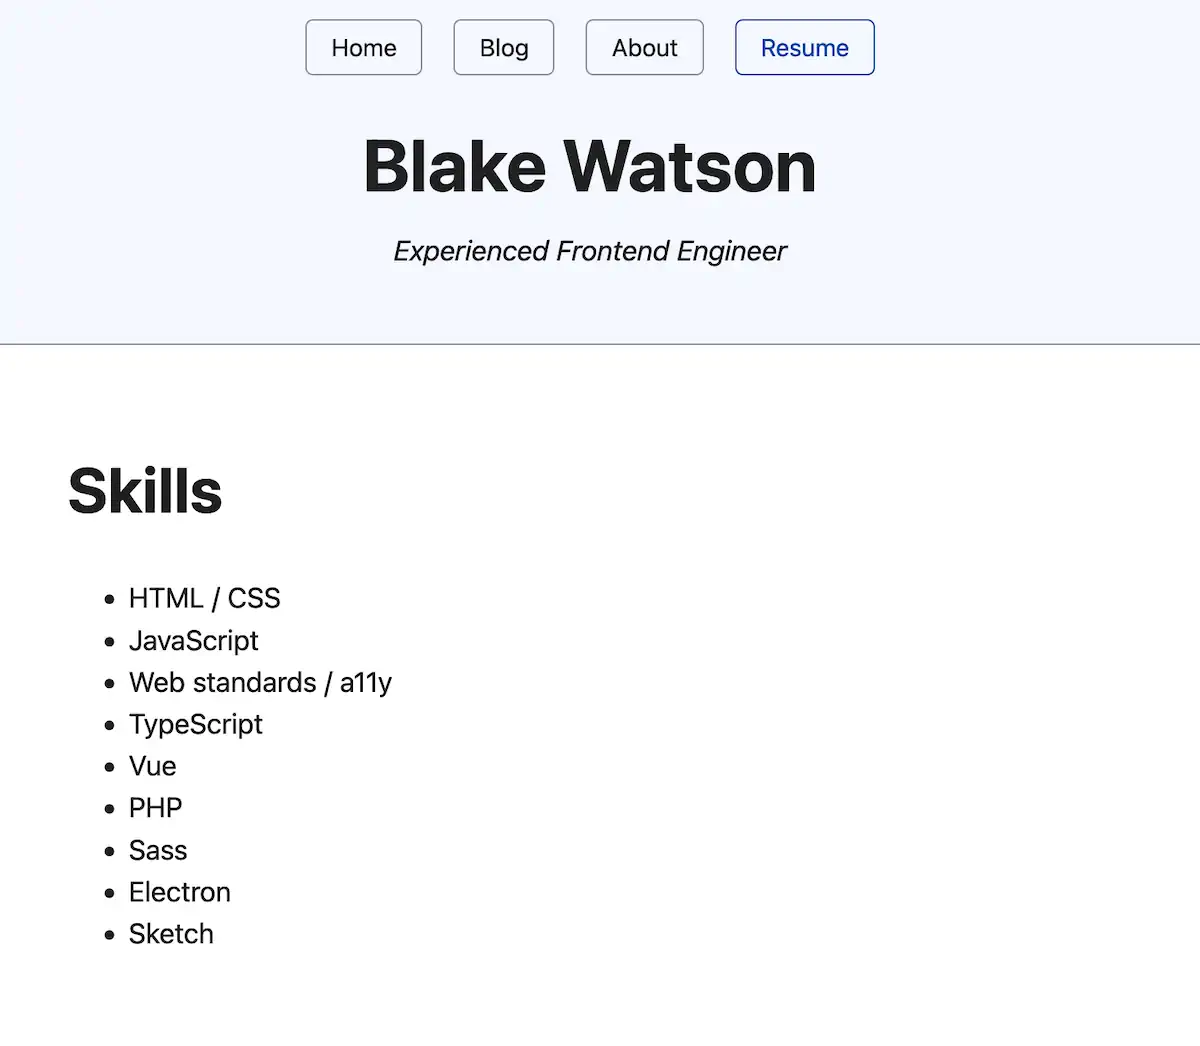
<section>
  <h2>Skills</h2>

  <ul>
    <li>HTML / CSS</li>
    <li>JavaScript</li>
    <li>Web standards / accessibility</li>
    <li>TypeScript</li>
    <li>Vue</li>
    <li>PHP</li>
    <li>Sass</li>
    <li>Electron</li>
    <li>Sketch</li>
  </ul>
</section>
Which renders like this.
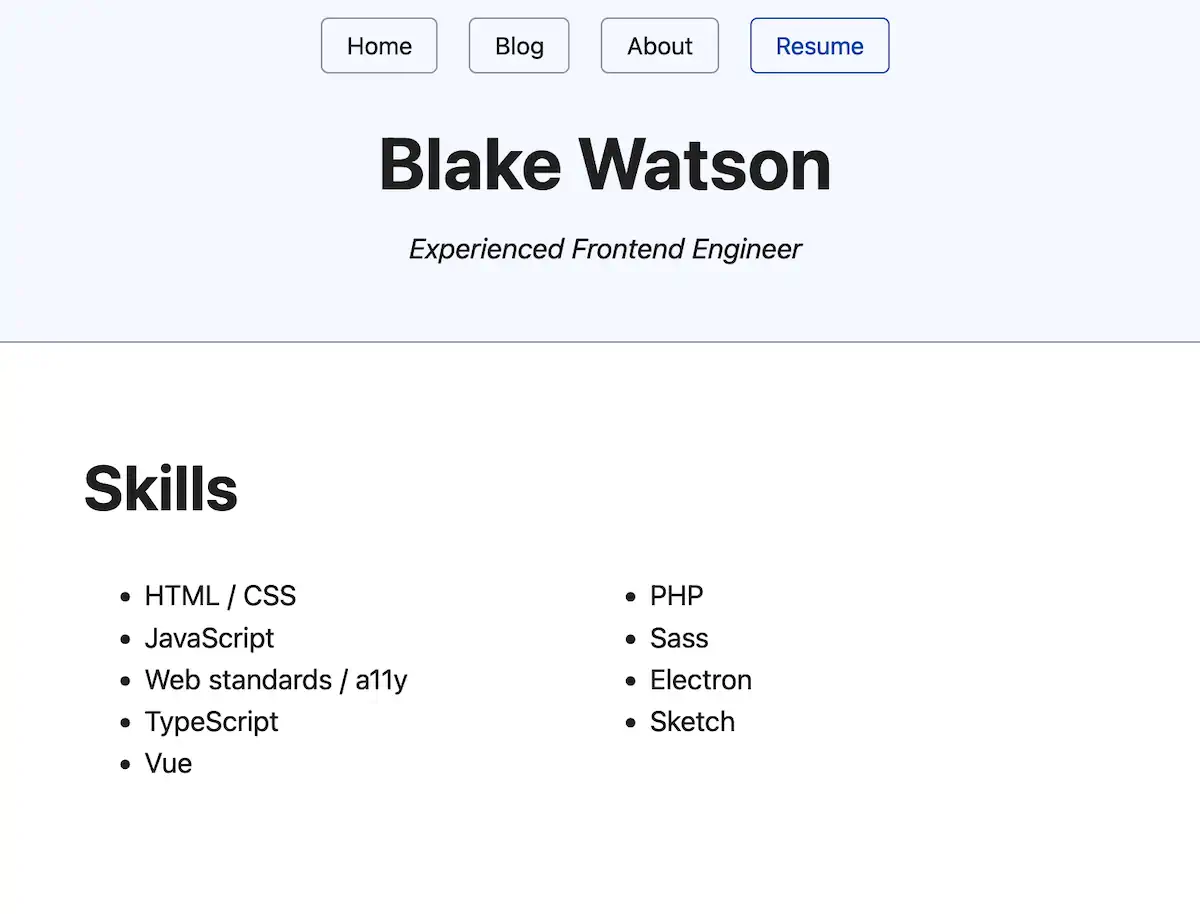
It’s a clean, bulleted list. That said, I feel there’s a bit of wasted space. It would be nice if we could split it into columns. There isn’t a strictly HTML way to do it, but I think it’s worth using a little CSS here to do the trick.
You’ve seen several tags using attributes by now. Every page of our site has links via the <a> tag, and each link has an href attribute, for example. Another handy attribute is style. It allows us to apply CSS directly to an HTML element. I’ll cover CSS a bit more in the bonus chapters at the end of this book, but for now, let’s use the style attribute to split the list into columns.
<section>
  <h2>Skills</h2>

  <ul style="columns: 2">
    <li>HTML / CSS</li>
    <li>JavaScript</li>
    <li>Web standards / accessibility</li>
    <li>TypeScript</li>
    <li>Vue</li>
    <li>PHP</li>
    <li>Sass</li>
    <li>Electron</li>
    <li>Sketch</li>
  </ul>
</section>
That gives us a more pleasing and space-efficient list.
Experience
I’m not a resume expert, but I think I’ll put my work experience next, as it’s probably what a potential employer in my field is most interested in. This will be different if you don’t have much experience or feel that education or other qualifications are more relevant.
Marking up content is as much an art as a science. There’s no single right way to do it. A guiding principle for choosing what tags to use is to ensure that the choices are meaningful and not based solely on appearance.
For example, you might be tempted to use an <h6> somewhere on your page because you want a tiny heading. But unless that heading is six heading levels deep, <h6> isn’t the best choice.
I’ll show you what markup I chose and what it looks like and then explain it.
<section>
<h2>Experience</h2>
<h3>Frontend Engineer</h3>
<p>
<strong>MRI Technologies</strong><br>
<time datetime="2019-08">August 2019</time>–Present
</p>
<ul>
<li>Build and maintain a spacesuit management app for NASA</li>
<li>
Build and maintain a document management system for Collins Aerospace
</li>
<li>Create reactive frontends with Vue, REST APIs, and GraphQL</li>
</ul>
<!-- ...the rest of the jobs go here -->
</section>That gives us a section that looks like this.
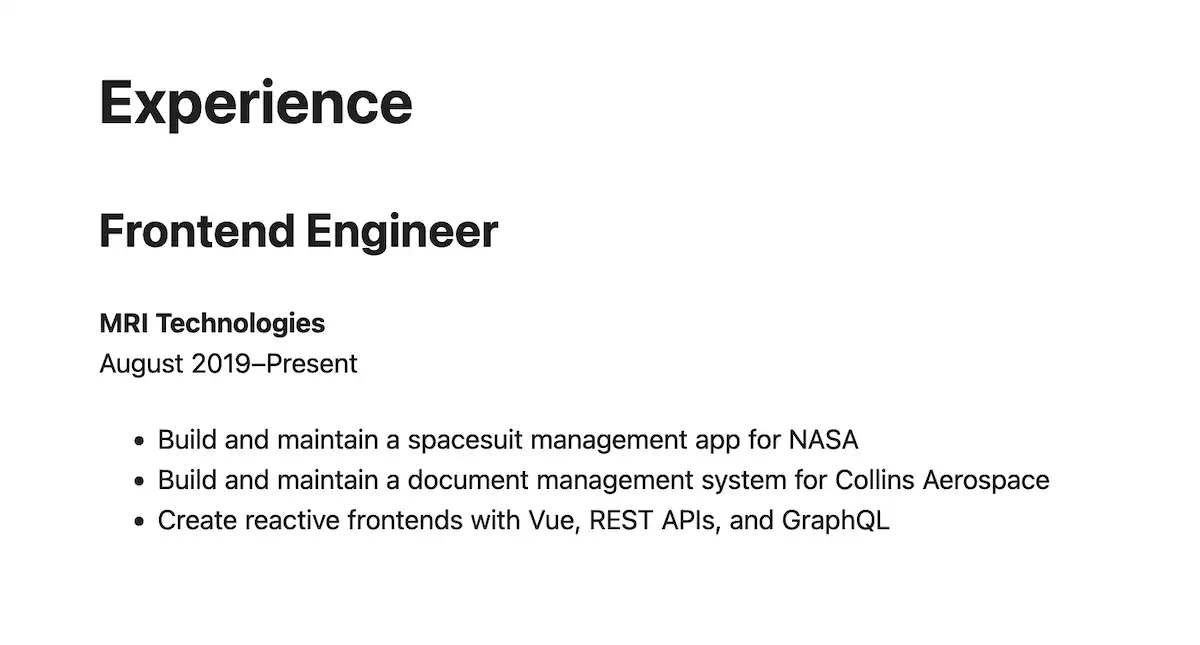
I will list several job roles I’ve had, so I’m using the position title as a heading (level 3, since it comes under the level 2 heading of Experience). Next, I want to display the employer and the time period. I chose to use a single paragraph to display these together. I’m using a manual line break to push the time range to the second line.
Another way to do it is to put the employer’s name in the heading after the job title. I don’t think one way is more correct than the other, and I prefer to reduce the amount of large text on the page.
We wrap the date in a <time> tag and provide the machine-readable date in the datetime attribute. I’m using an HTML entity, – to put a dash between the start and end dates. This is to use the en dash character, which is a slightly longer dash than a regular hyphen (-) and is used for numeric ranges in typography.
Finally, I use an unordered list to provide bullet points about my role and responsibilities.
I’ll go ahead and add the rest of my work experience. I’ll add the complete code for that at the end of the chapter. You can also check out the demo resume and view the source.
Selected projects
Moving on to the next section, I’d like to draw some attention to selected projects I’ve worked on. This is a resume version of a portfolio—a place where I can show websites I’ve made and link to them if applicable. Printed resumes are typically text-based, but since this is a webpage, you could include an image or two in this section.
For these projects, I’ll use the <h3> tag for the project title and put a paragraph description with it. If the project is live on the web, I’ll link to it. Here’s an example.
<section>
  <h2>Selected projects</h2>

  <h3>Mississippi Gulf Coast Community College</h3>

  <p>
    I worked on this website in my role as designer and developer at Mad Genius. I built out several of the dynamic, data-intensive sections like the searchable course catalog and the comprrehensive "A to Z" index. These sections made heavy use of reactive UI, third-party API integrations, and custom WordPress plugin development.
  </p>

  <p><a href="https://mgccc.edu/">mgccc.edu</a></p>

  <!-- ...the rest of the projects go here -->
</section>
Education
Finally, I’ll add my degrees, university, year of graduation, and study area. I use simple paragraphs with <strong> for emphasis and <br> for manual line breaks.
<section>
  <h2>Education</h2>

  <p>
    <strong>Master of Business Administration</strong>, <time>2009</time><br>
    <em>Mississippi State University, Starkville, MS</em>
  </p>

  <p>
    <strong>Bachelor of Business Admiinistration</strong>, Information Systems,
    <time>2007</time><br>
    <em>Mississippi State University, Starkville, MS</em>
  </p>
</section>
Complete example
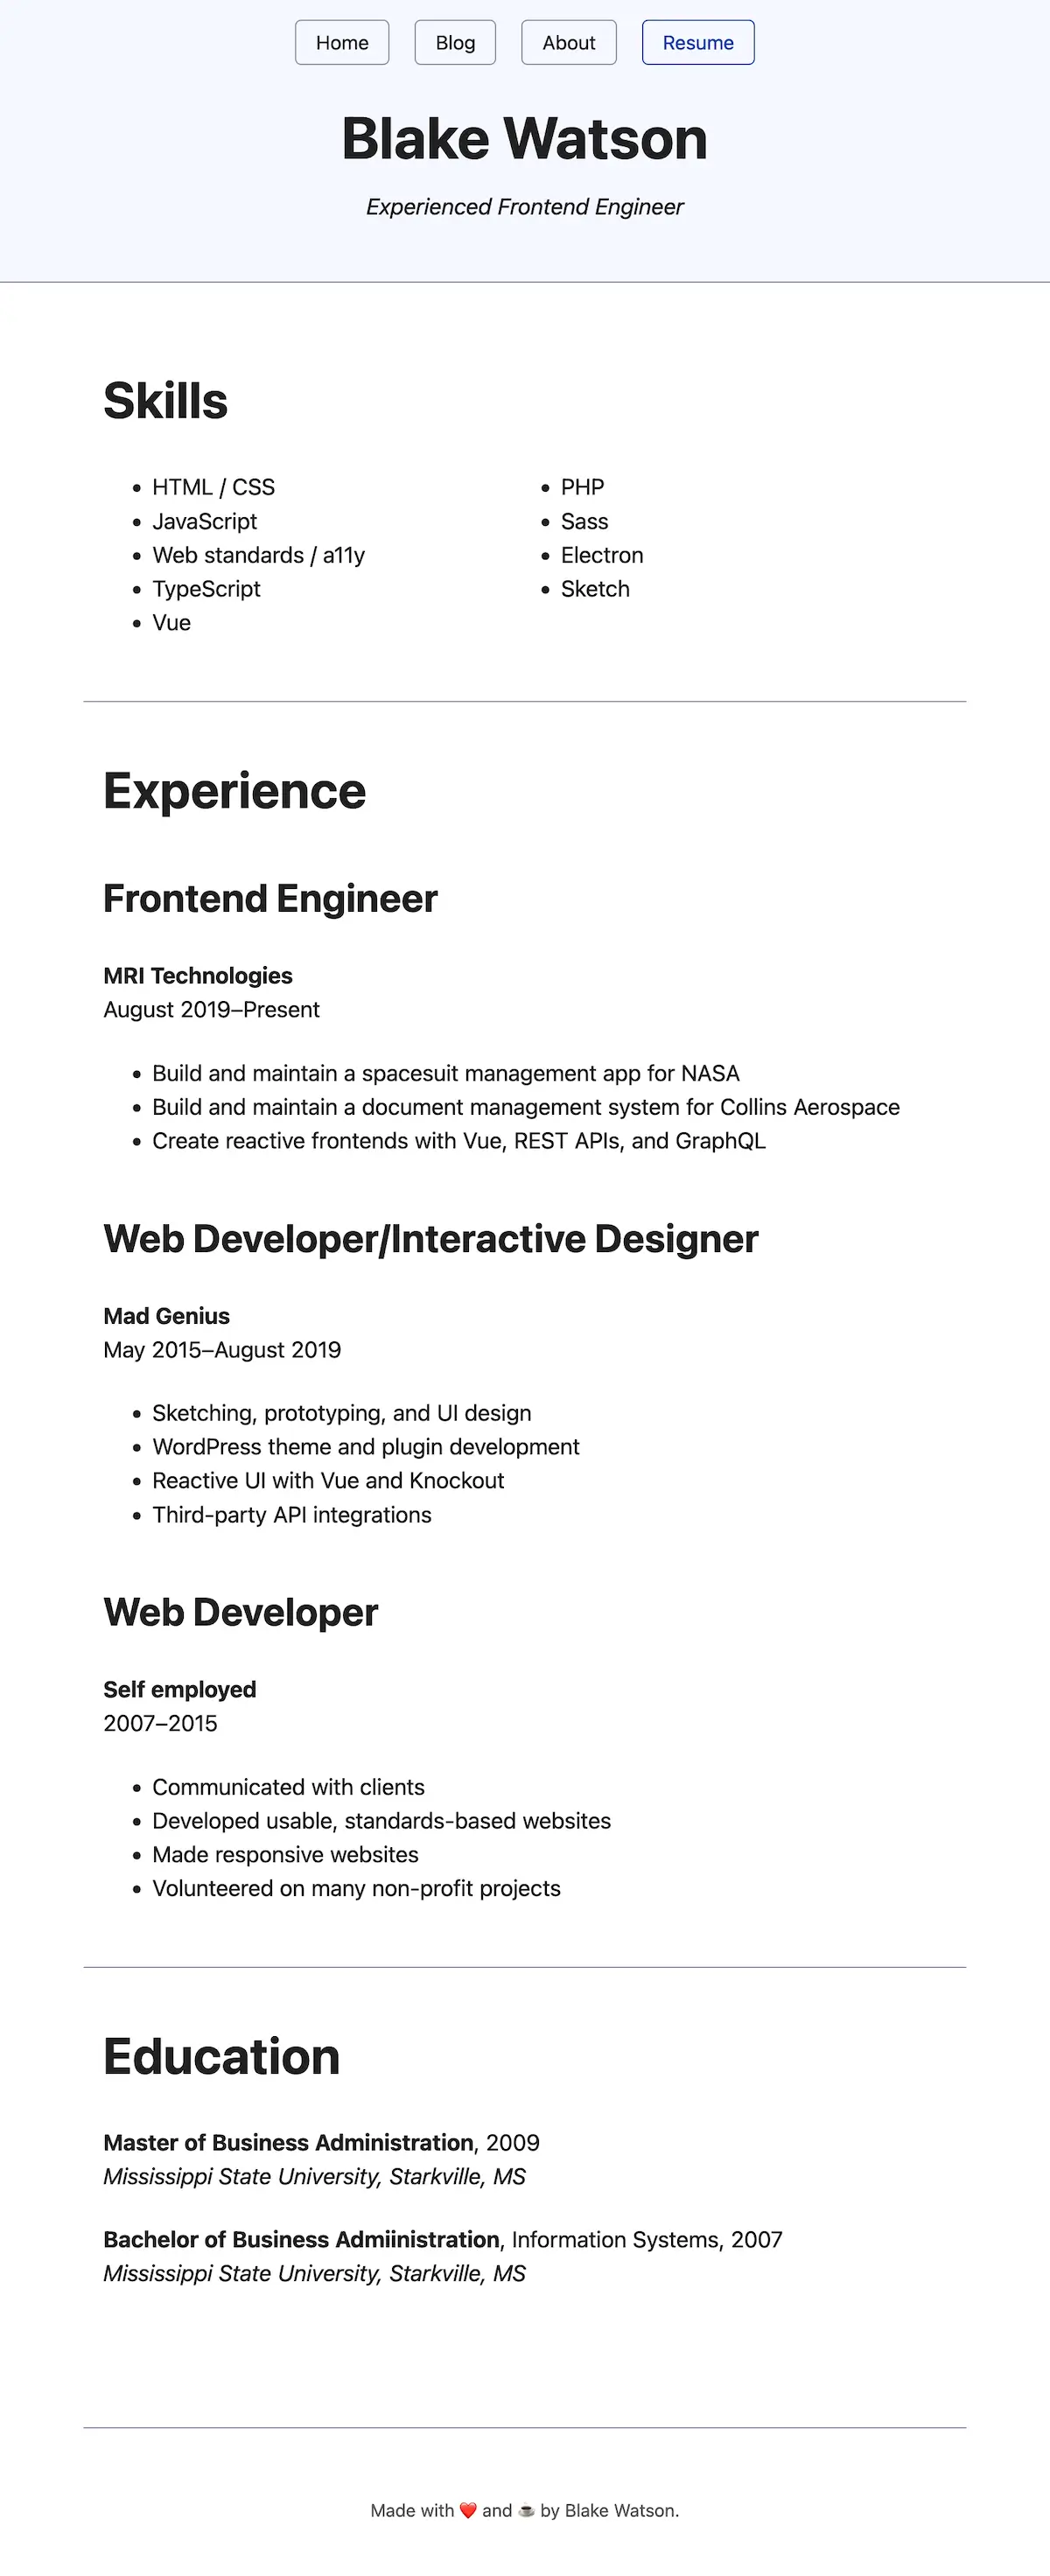
Here’s the complete code, including the header and main content areas.
<header>
<nav>
<a href="index.html">Home</a>
<a href="blog/index.html">Blog</a>
<a href="about.html">About</a>
<a href="resume.html" aria-current="page">Resume</a>
</nav>
<h1>Blake Watson</h1>
<p><em>Experienced Frontend Engineer</em></p>
</header>
<main>
<section>
<h2>Skills</h2>
<ul style="columns: 2">
<li>HTML / CSS</li>
<li>JavaScript</li>
<li>Web standards / a11y</li>
<li>TypeScript</li>
<li>Vue</li>
<li>PHP</li>
<li>Sass</li>
<li>Electron</li>
<li>Sketch</li>
</ul>
</section>
<section>
<h2>Experience</h2>
<h3>Frontend Engineer</h3>
<p>
<strong>MRI Technologies</strong><br>
<time datetime="2019-08">August 2019</time>–Present
</p>
<ul>
<li>Build and maintain a spacesuit management app for NASA</li>
<li>Build and maintain a document management system for Collins Aerospace</li>
<li>Create reactive frontends with Vue, REST APIs, and GraphQL</li>
</ul>
<h3>Web Developer/Interactive Designer</h3>
<p>
<strong>Mad Genius</strong><br>
<time datetime="2015-05">May 2015</time>–<time datetime="2019-08">August 2019</time>
</p>
<ul>
<li>Sketching, prototyping, and UI design</li>
<li>WordPress theme and plugin development</li>
<li>Reactive UI with Vue and Knockout</li>
<li>Third-party API integrations</li>
</ul>
<h3>Web Developer</h3>
<p>
<strong>Self employed</strong><br>
<time>2007</time>–<time>2015</time>
</p>
<ul>
<li>Communicated with clients</li>
<li>Developed usable, standards-based websites</li>
<li>Made responsive websites</li>
<li>Volunteered on many non-profit projects</li>
</ul>
</section>
<section>
<h2>Education</h2>
<p>
<strong>Master of Business Administration</strong>, <time>2009</time><br>
<em>Mississippi State University, Starkville, MS</em>
</p>
<p>
<strong>Bachelor of Business Admiinistration</strong>, Information Systems, <time>2007</time><br>
<em>Mississippi State University, Starkville, MS</em>
</p>
</section>
</main>You can see how this looks on the demo site, but here’s a full-page screenshot.
Up next
We’ve been creating a lot of content. In the next chapter, we’ll take an intermission and look at how we can run a web server on our computer that more closely resembles a live website.